Effective Ways to Screen Record on Windows 10: Get Started in 2025!
Effective Ways to Screen Record on Windows 10: Get Started in 2025!
If you’re looking to **screen record on Windows 10**, you’ve come to the right place. This comprehensive guide covers various methods, including built-in tools and third-party applications, to ensure you can capture videos effectively. Whether it’s for creating tutorials, recording gameplay, or capturing presentations, we’ll share everything you need to know about the best **screen recording** techniques. Let’s dive in!
Understanding Windows 10 Built-in Screen Recorder
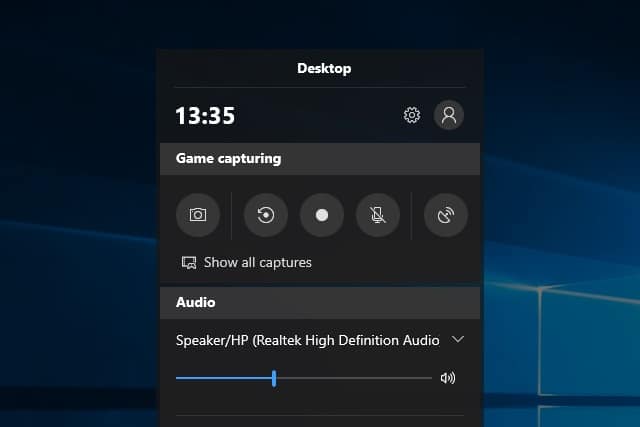
One of the easiest methods to **screen record**, especially for beginners, is by utilizing the built-in **Windows 10 screen recording** feature via the Xbox Game Bar. This tool allows you to capture screen activity without installing additional software. To get started, press the **Windows key + G** to open the Game Bar. From there, you can access the recording options. Make sure to enable your microphone if you want to **record screen with audio**.
Setting Up the Xbox Game Bar
Before you initiate recording, configuring the **screen recording settings** is crucial for optimal results. First, head to **Settings > Gaming > Xbox Game Bar** to ensure it is enabled. Customize your keyboard shortcuts for quick access: for instance, **Windows key + Alt + R** to start or stop recording. Testing your audio settings beforehand can help capture clear sounds, which enriches your recording quality. Remember, if you’re **recording a presentation**, enabling direct audio input will allow you to narrate seamlessly.
Recording Gameplay on Windows
To specifically **record gameplay on Windows**, the Xbox Game Bar is efficient. Begin with launching your game, then use the **record screen in Windows** by pressing **Windows key + G**. Look for the **Capture** widget in the Game Bar interface and choose the record button to log your gameplay. For best results, ensure your video settings are optimized in your game for a smooth recording experience. This built-in tool ensures that even high-paced action is captured without lag.
Top Free Screen Recording Software Options
If you require advanced features or wish to bypass the Xbox Game Bar, numerous **free screen recording** solutions are available. Applications like OBS Studio, ShareX, and FlashBack Express offer robust capabilities that can take your recordings to another level. These tools allow for enhanced editing, layout configurations, and more extensive **screen recording functionalities** that built-in options may not provide.
Choosing the Best Screen Recorder
When choosing between software applications, consider your needs. Do you prefer an intuitive interface, or are you looking for advanced features? **Screen recording software comparisons** often rank OBS Studio as one of the best due to its flexibility, but its complex setup may deter some users. Alternatively, players often favor Bandicam for its simplicity when capturing gameplay. Researching **screen recording app** reviews can also provide insight into user experiences and help you decide.
Customizing Your Screen Captures
Many recording tools offer options to seize various parts of your screen, be it full-screen, a selected window, or defined region. This flexibility is crucial for individuals creating content like online courses or marketing materials. Learn to use **screen capture tools** effectively by exploring features like **motion effects** or adding your webcam feed. It’s worth experimenting with different setups to see what works best for your projects.
Editing and Saving Your Screen Recordings
After recording, the next step is editing content to refine your video. Essential **screen recording editing techniques** can significantly enhance your output quality. Most advanced screen recording software comes equipped with basic editing features, but for more intricate tweaks, consider using dedicated video editing software. Programs like DaVinci Resolve or Camtasia make it easy to cut, merge, and even add effects to your videos.
How to Save Screen Recordings
Once you’ve finished editing, knowing how to **save screen recordings** correctly is essential. Always check the format and resolution settings before finalizing. Most programs will allow you to choose popular formats like MP4, which is widely supported across platforms. Additionally, keeping storage solutions in mind is vital—consider using **cloud storage for screen recordings** to avoid loss and provide easy access for sharing.
Sharing and Publishing Your Recordings
Sharing your recordings is straightforward, whether uploading to YouTube, presenting to colleagues, or sharing a video tutorial. Ensure your **screen recording features** are set to privacy levels that suit your audience. Utilizing platforms like Vimeo or Google Drive provides additional security if you’re showcasing sensitive content. Take advantage of these platforms to gain feedback and enhance viewer engagement by sharing your video with specific audiences.
Best Practices and Tips for Screen Recording
A few best practices increase the quality of your recordings significantly. First, familiarize yourself with **screen recording tips** to avoid common pitfalls, such as background noise or unintended screen distractions during live recording sessions. It’s also advisable to test all hardware, like microphones and webcams, to ensure optimal performance during recording.
Optimizing Screen Recording Quality
For high-quality output, keep in mind factors like screen resolution and framerate. Configuring the **screen resolution settings** appropriately can avoid stretched or pixelated videos. A higher framerate, typically 30 FPS or more, is essential for gameplay recordings, contributing to smoother visuals. Familiarizing yourself with these settings in your chosen software can improve your recorded content remarkably.
Engaging Your Audience with Screen Recording
When using recorded video content, consider methods to engage your viewers actively. Features like annotations can aid understanding and draw attention to specific areas of the screen. Adding print or text can illustrate your points more effectively and maintains viewer interest. If using the recordings for educational purposes, incorporating question segments can provoke audience responses and enhance the learning experience.
Key Takeaways
- Familiarize yourself with both built-in and third-party **screen recording** tools.
- Optimize your settings for audio and video before starting a recording.
- Engage your audience by editing recordings to enhance understanding.
- Explore options for sharing and storing your recordings post-production.
- Continually refine your recording techniques based on audience feedback.
FAQ
1. What is the best free screen recording software for Windows 10?
The best free screen recording software options include OBS Studio and ShareX, both praised for their features and usability. They consistently rank high for capturing high-quality videos, especially for gameplay and tutorials.
2. Can I record the desktop activity on Windows 10?
Absolutely! You can **record your screen** activity on Windows 10 using the built-in Xbox Game Bar. Alternatively, consider using a dedicated **screen recording app** like OBS for more extended sessions and editing capabilities.
3. How can I enhance the quality of my screen recordings?
To enhance recording quality, aim for the highest resolution and framerate settings supported by your equipment. Additionally, recording in a quiet room can eliminate background noise, resulting in crisp audio and clearer visuals.
4. Is it necessary to edit screen recordings?
While it’s not strictly necessary, editing your recordings often greatly improves the final product. It allows you to cut unnecessary sections, add notes or visual aids, and enhance the overall presentation, making it more professional.
5. How do I share my screen recordings?
You can share screen recordings via platforms like YouTube, Vimeo, or Google Drive. Be sure to choose privacy settings that fit your needs when sharing sensitive or personal content.
By utilizing these tips and tools, you’re well on your way to mastering **screen recordings** on **Windows 10** for 2025 and beyond!