How to Clear Cache in Edge: Simple Methods for a Faster Browsing Experience in 2025
How to Clear Cache in Edge: Simple Methods for a Faster Browsing Experience in 2025
When it comes to improving your browsing experience, learning how to clear cache in Edge effectively is crucial. With the rise in internet usage and the sheer volume of data we encounter daily, eliminating clutter such as the cached files in your Microsoft Edge browser can greatly enhance browsing speed and overall performance. In this guide, we will explore comprehensive steps on how to clear cache in Microsoft Edge, manage your edge settings, and understand the benefits of regular cache clearing.
Understanding Microsoft Edge Cache
Before we delve into the steps, let’s take a moment to understand what cache is and its significance in web browsing. A browser cache stores copies of files, images, and web pages from the internet on your local device. This process speeds up loading times during future visits to the same sites, thereby improving overall browsing efficiency. However, an overly full cache can hinder performance, making it essential to delete browsing data in Edge periodically. By managing your Microsoft Edge cache, you can not only speed up Edge but also maintain its smooth functionality.
Key Reasons for Clearing Microsoft Edge Cache
There are several compelling reasons to remove cached data in Edge:
1. **Performance Improvement**: Accumulated cache can bog down your browser, leading to slower load times. Regular clearing can reclaim speed.
2. **Fixing Browsing Issues**: Sometimes, outdated files can cause the browser to act unpredictably. Clearing your cache often resolves these issues.
3. **Privacy Maintenance**: A full cache can endanger your privacy as sensitive data accumulates over time. Regular wipes enhance security. By understanding these reasons, you can maintain a well-functioning and secure browsing environment.
How Cache Impacts Browsing Speed
Understanding Edge cache efficacy is pivotal. Cache files help load sites faster upon re-visits, as resources don’t need to be downloaded each time. However, letting this cache pile up can ironically decrease performance as Edge may load outdated versions of sites or misconfigurations. To ensure Optimum performance, it’s essential to routinely schedule cache cleaning in Edge. Implementing clearing on a bi-weekly basis can effectively minimize unwanted slowdown. Engaging in these practices will allow for a smoother and more enjoyable browsing experience.
Accessing Edge Cache Settings
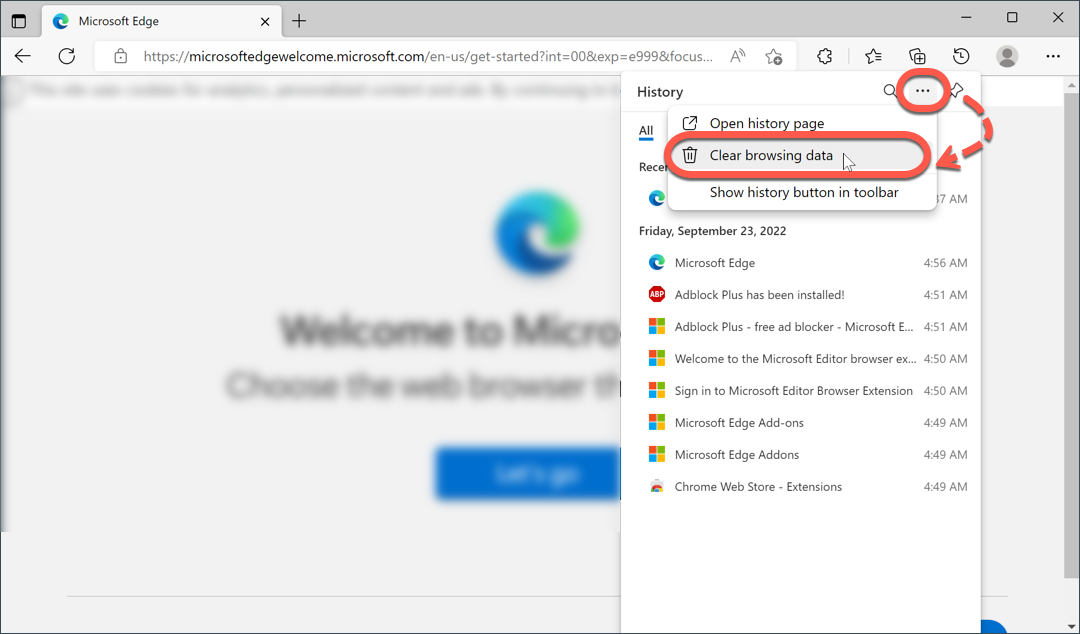
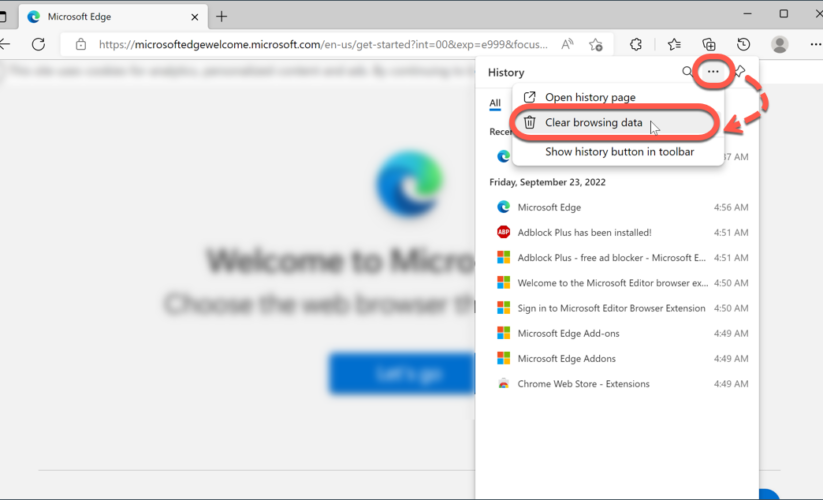
To successfully clear cookies and cache in Edge, one must know where to locate the relevant settings. Thankfully, Microsoft Edge offers an intuitive settings menu. Here’s a quick overview of how to navigate Edge settings:
1. Launch Edge and select the three dots in the top-right corner.
2. Click on **Settings** and navigate to **Privacy, Search, and Services**.
3. Under ‘Clear Browsing Data’, select **Choose what to clear**.
Navigating these steps will lead you directly to settings crucial for effective Microsoft Edge cache removal.
Clear Cache in Edge: Step-by-Step Guide
The process of clearing your cache is straightforward, especially with Microsoft Edge’s user-friendly interface. Below are detailed steps to delete cache in Edge for you to follow:
Direct Method to Clear Edge Cache
Beginning your journey of Edge browser cache clear steps** usually involves accessing the essential settings described above. Here’s a streamlined version of the steps:
1. Open Microsoft Edge and go to **Settings**.
2. Browse to **Privacy, Search, and Services**.
3. Click on the button labeled **Choose what to clear**.
4. Select the types of data you want, ensuring “Cached images and files” is included.
5. Finally, click on **Clear Now**.
This fast method will help you get rid of old cache efficiently and harden your Edge performance across all sessions.
Using Keyboard Shortcuts for Quick Access
Clear Edge cache manually** can often seem tedious. Leverage keyboard shortcuts to expedite your cache clearing!
– Press **Ctrl + Shift + Delete** simultaneously while Edge is open to directly take you to the ‘Clear Browsing Data’ menu.
– Follow up as described previously to select **Cached images and files**.
Using shortcuts will enhance your productivity when managing browser data in Microsoft Edge and ensure a more organized browsing experience overall.
Future-Proofing Your Edge Browser
To maintain optimal performance, consider configuring Edge settings that automatically clear data at regular intervals. This can be set up through **’Clear Browsing Data on exit’** options, accessible from the same Settings menu. Make sure you regularly review these settings to stay ahead—empowering you to manage your browsing environment effectively, preventing unwanted build-up in your cache space.
After-Clearing Browser Maintenance
Once you’ve cleared your cache, follow these maintenance tips to ensure further optimal performance in Edge. Clearing cache is only one part of continuous improvement:
Restarting Edge to Improve Performance
It’s a good habit to restart your Microsoft Edge browser shortly after clearing your cache. Such a restart ensures all new configurations and cleaned data are effectively integrated. Post-clearance restarts have shown to contribute remarkably to the speed, making them a critical part of your caching routine and an essential part of a best practices for Edge cache approach.
Keenly Monitor Privacy Settings
IncorporATING diligent monitoring of your privacy settings greatly enhances overall security. Navigate to **Settings > Privacy, Search, and Services** regularly, adjusting settings that control what data Edge collects and how cached or history data must be treated. Proper management ensures you’re navigating secure and private browsing pathways.
Key Takeaways
- Regularly clear cache in Edge to improve performance metrics.
- Understanding how to access Edge settings can facilitate effective cache management.
- Utilizing shortcuts improves speed when wishing to clear cache periodically.
- Post-clearing maintenance steps help retain maximum browsing speed.
- Fine-tuning privacy settings allows continuous secure browsing.
FAQ
1. How often should I clear cache in Edge?
It is advisable to clear your cache in Microsoft Edge at least once every two weeks to balance between quick loading times and storing relevant cached files. Most users find that a bi-weekly schedule optimizes their browsing experience, enhancing the overall performance of Edge.
2. Will clearing cache in Edge delete my saved passwords?
No, clearing the cache will not affect saved passwords in Edge. However, if you opt to clear browsing history or cookies, you may lose saved sessions or be logged out from certain sites. Always ensure you review the options before confirming the cleaning process. To keep passwords, they must be stored within a password manager or the Edge password settings.
3. What does deleting browsing data in Edge include?
Deleting browsing data in Microsoft Edge includes cached images, cookies, browsing history, and more. Users can select specific types of data they want to clear from settings, allowing for customized control depending on their storage needs and preferences.
4. Can I automate clearing cache in Edge?
Yes, through privacy settings, you can enable options to automatically clear cache and browsing data whenever you exit Edge. This feature consistently keeps the browser performance optimized without manually ongoing intervention.
5. What are the shortcut keys to access Edge settings quickly?
Pressing **Alt + E**, or the **three dots** icon in the upper right corner quickly brings up the settings menu. From there, you can adjust privacy settings, clear cache, and enhance your overall Edge experience with ease.
With these comprehensive tips in mind, you can ensure a smooth and productive browsing experience in Microsoft Edge throughout the year 2025 and beyond!