How to Properly Create a Hanging Indent in Word for Improved Formatting
How to Create a Hanging Indent in Word for Improved Formatting
Effective formatting in Word is essential for creating professional documents, and **hanging indents** are a vital aspect of this. Hanging indents are particularly useful in organizing lists, citations, or any formatted text, ensuring a clear, organized presentation. This article will guide you through the process of creating a **Word hanging indent**, complete with step-by-step instructions, tips, and tricks for navigating indentation settings effectively in various versions of Word, including Word 2013 and Word 2020.
Understanding Hanging Indents
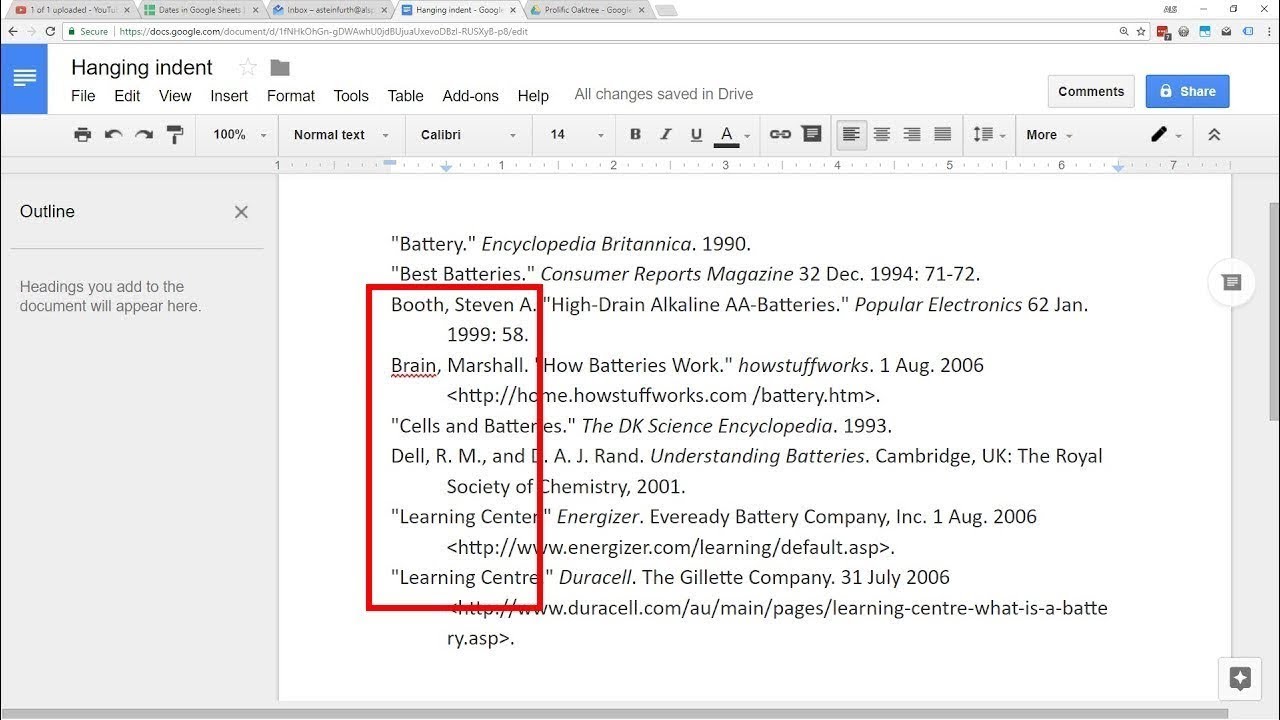
A **hanging indent** is a formatting style in which the first line of a paragraph is flush with the left margin, while subsequent lines are indented. This style is commonly utilized in academic papers, especially in citation formats like **APA** and **MLA**. By using a **hanging indent**, you improve readability and organize your content in a visually appealing manner. It’s crucial for academic papers and other professional reports, where clear information presentation is paramount.
Defining the Hanging Indent Style
The **hanging indent** style is straightforward yet effective. In this style, the first line of a paragraph remains aligned with the left margin, while all the subsequent lines are shifted to the right. This format can enhance the visual hierarchy of your document, allowing readers to easily navigate between different sections or references.
Benefits of Using a Hanging Indent in Citations
One of the most significant applications of a **hanging indent** is in citation formatting. Styles such as **APA** and **MLA** strongly recommend using hanging indents for references or bibliography entries. For instance, if you are writing a paper requiring citations, implementing a hanging indent helps the reader efficiently locate sources referenced in the text. Formatting your citations with a hanging indent clearly separates the authors’ names from the rest of the citation, optimizing readability.
How to Create a Hanging Indent in Word
Creating a **hanging indent** in Word is simple and can be accomplished in various ways. Understanding these different methods will allow you to choose the one that fits your workflow best. Here, we will explain methods for different versions, including **Word 2013** and **Word 2020**.
Using the Ruler to Set a Hanging Indent
The easiest way to create a hanging indent is through Word’s ruler tool. Here’s how:
- Open your Word document.
- Select the paragraph you wish to format with a hanging indent.
- Locate the ruler at the top of your document. If it’s not visible, enable it via the “View” tab by checking the “Ruler” box.
- On the ruler, you will see two markers: a triangle pointing down (for the first line indent) and a rectangle (for the left indent). Move the rectangle to the right to set the desired indent for all lines, while the triangle should remain flush with the left margin.
This method gives you precise control over your paragraph formatting, allowing for quick adjustments as necessary.
Using Paragraph Settings for Configuring Hanging Indents
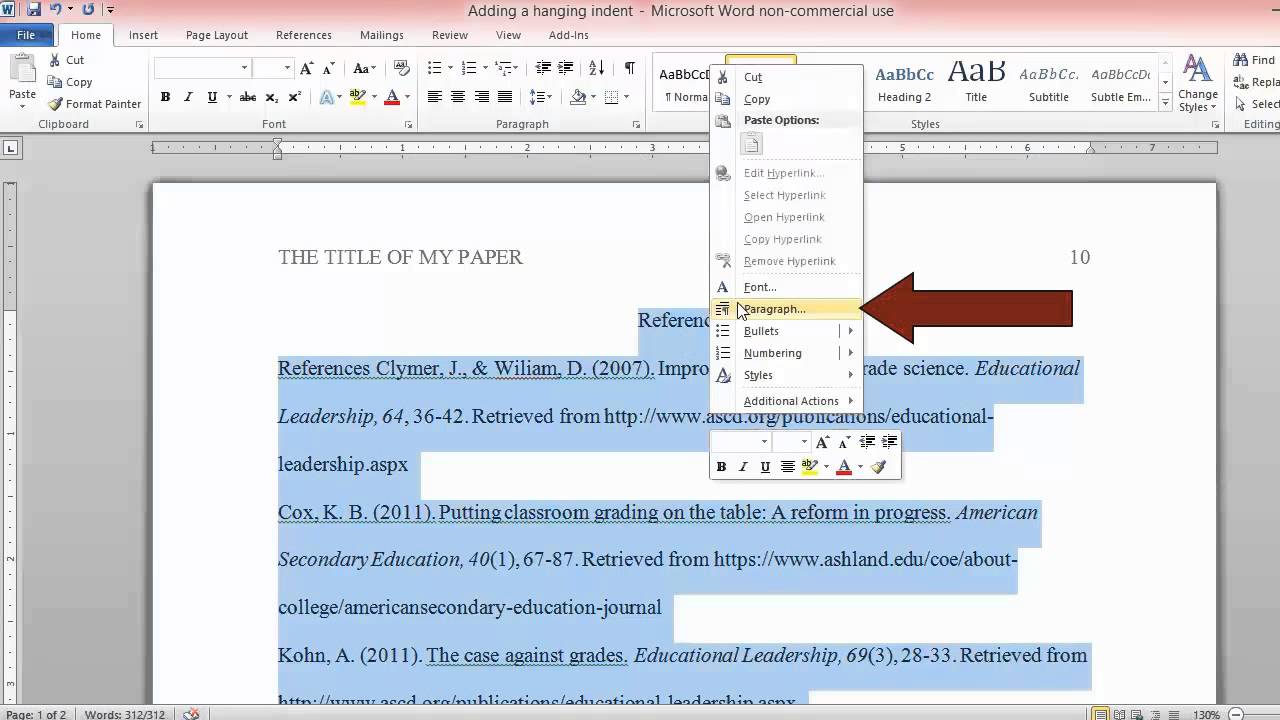
Alternatively, you can establish a **hanging indent** through paragraph settings:
- Select the text or paragraphs you want to format.
- Right-click and choose “Paragraph” from the context menu.
- In the “Indentation” section, find the “Special” dropdown menu and select “Hanging.”
- You can adjust the depth of the hanging indent in the “By” field next to it, where the default is typically set to 0.5 inches.
- Confirm the settings by clicking “OK.”
This method provides a uniform and easily repeatable process when formatting multiple paragraphs in your Word document.
Adjusting Hanging Indents in Word
<pSometimes, after creating a hanging indent, you may want to make adjustments for aesthetics or specific requirements. Learning to **adjust hanging indents** is crucial for effective document formatting.
Controlling Paragraph Indents with Tab Stops
Customizing **hanging indents** can involve using tab stops effectively. You can set tab stops to manage where indents apply to specific parts of your text. To set a tab stop:
- Click on the ruler where you’d like to place your tab stop. A small L-shaped symbol will appear.
- Now, any time you press the Tab key, your text will jump to that point, allowing you to keep your hanging indent consistent throughout.
This technique ensures every formatted paragraph exhibits uniformity in indentation.
Common Issues with Hanging Indents
Users often face challenges while trying to set hanging indents correctly. Common problems include lines not aligning as expected or the **hanging indent** not being applied properly. These issues are often resolved by checking that the correct paragraph settings are applied or by making sure the ruler settings are adjusted correctly. Some users may also find hidden formatting tags affecting the indents, which can usually be resolved by clearing formatting options.
Formatting Tips for Improved Word Document Layout
Beyond just hanging indents, there are several formatting tips that can enhance the overall layout of your Word documents. Proper paragraph settings and other text formatting options can contribute to a polished final product.
Using Styles to Maintain Consistent Formatting
Leverage Word’s built-in styles for maintaining a consistent format across your document. Applying different styles allows you to quickly edit the formatting should you ever need to. Modify a style once, and it automatically updates throughout your document. This technique is beneficial for maintaining a cohesive look, particularly in longer documents.
Regularly Reviewing Formatting Settings
Make it a habit to periodically review your document’s formatting settings, including margins, text formatting, and **indent settings in Word**. Conflicts or discrepancies often arise as documents evolve, so regular updates can assist in avoiding formatting hassles later on.
Key Takeaways
- Hanging indents improve readability and organization, especially in academic citations.
- Utilizing the ruler and paragraph settings are effective ways to create and adjust hanging indents in Word.
- Employ tab stops for more precise control over your paragraph formatting.
- Consistently review and adjust formatting settings for improved document appearance and professionalism.
FAQ
1. What is a hanging indent?
A **hanging indent** is when the first line of a paragraph is flush with the left margin, with the subsequent lines indented. This format enhances clarity and is often used in academic citations.
2. How do you adjust margins for hanging indents?
To adjust margins for a **hanging indent**, navigate to the “Layout” tab and modify the margin settings. Ensure the left margin allows for the desired indent space for proper formatting.
3. What are the common issues while setting a hanging indent?
Common issues include improper alignment of lines and applying indentation incorrectly due to accidental formatting changes. Reviewing both paragraph settings and ruler adjustments typically resolves these concerns.
4. Can I create a hanging indent using shortcuts?
Yes! In many versions of Word, you can quickly create a **hanging indent** by pressing “Ctrl + T” on your keyboard, which will create the indent you need.
5. How do I fix a hanging indent that is not consistent?
First, ensure that all affected paragraphs have the same indentation settings. Additionally, check for hidden formatting marks that might interfere with the layout, and adjust as necessary.